
In my last two posts, I discussed how to:
- Quickly integrate the AddThis social media tool into the share buttons in a Znode B2B Ecommerce platform.
- Apply the AddThis social media tool for your Znode B2B Ecommerce Platform to add a link promotion to your Znode B2B Ecommerce platform, which allows you to show promotional messages and pop-ups on an ecommerce site to attract end-users and increase new orders.
In this post, you’ll learn how to use the AddThis social networking tool to incorporate List Building into your Znode B2B Ecommerce platform, which allows you to grow your email list and subscriber base using the List Building tool. You can integrate with it Mailchimp, HubSpot, Campaign Monitor, and other major third-party email marketing platforms.
Using this tool, you’ll be able to send emails featuring promotions, new goods, festival bargains, and other information to subscribers. Users may subscribe to an ecommerce email list for a variety of reasons, including learning more about a company, receiving relevant offers and product launch alerts, claiming a discount coupon, having access to a special offer in exchange for email addresses, and more.
Understanding List Building
With the AddThis List Building tool, you can easily collect emails and expand your subscriber list.
Types of List Building
- List Building Banner
Use the List Building Banner to collect emails from your visitors without interfering with their surfing experience. It floats gently at the top or bottom of your page, acting as a clear, persistent call-to-action that doesn’t get in the way of your visitors.
- List Building Popup
The List Building Popup is prominently displayed in the center of your screen, drawing the greatest attention. By putting your company’s identity into the List Building Popup, you can give it your own unique spin.
Set boundaries for when and to who your call-to-action should be presented to.
- List Building Slider
As visitors interact with your content, you’ll increase revenue and capture more emails. When someone scrolls to the bottom of the page, the List Building Slider slides in, incorporating your company’s branding and adding flair to the design. Determine when and to whom your call-to-action should be directed.
Advantages of List Building
There are a few different benefits of list building, such as:
- Growing your email list
- You can increase the number of people who subscribe to your newsletter and keep in contact with those interested in your organization.
- Decrease cart abandonment
- Offer discounts or promotions such as free shipping for your visitor’s email addresses.
- Produce more sales value
- Give access to special offers to produce more sales value
- Generate Leads
- Obtain more leads and nurture them through their client journey.
To use AddThis to add the List Building tool to your Znode B2B Ecommerce platform, please follow the instructions below:


- Click “Tools.”
![]()
- Click “+ADD NEW TOOL”
![]()
- Select the “List Building”

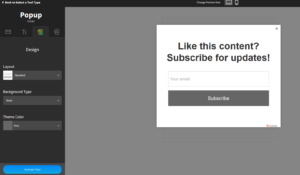
- Select the “popup” tool type, which will allow you to show a “subscribe message” in a popup.
Below is the desktop view:

Below is the mobile view:

Click on the “continue” button.
- Next, you’ll want to select a third-party email subscription service on the “Email Service.”

a. I had a Mailchimp login, so I selected the “Mailchimp” email subscriber service and clicked the “Connect” button. This will take you to the Mailchimp login page.

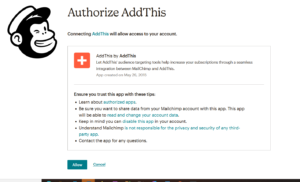
b. When you’ve logged in, you’ll be directed to the “Authorize AddThis” page. This will give you access to the tool. Select the “Allow” option.
c. Redirect to AddThis site and select a list and select a field if you want to show an additional field on the subscriber popup. Click the Apply button.
- From the drop-down menu, you’ll select the “Mailchimp” email collection service.
- Select “ecommerce.”
- Select “None.“

- Open the “Text” tab:
-
- You’ll want to add a Headline text in the textbox.
- You’ll write, “Like this content? Subscribe for updates!” for the sample header.
- Change the “Submit” button text in the textbox.
- Write “Subscribe” for the “yes” button text.
- You’ll want to add a Headline text in the textbox.

- Next, we’ll open the “Design” tab:
- From the drop-down, you’ll choose the “Standard” layout.
- Then, select the “None” background type.
- Finally, you’ll choose the “Grey” theme color.
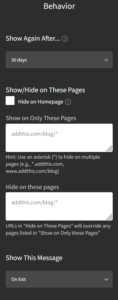
- Now, open the “Behavior” tab:
- Select the “Show Again After…” option. Next, specify when a link promotion should reappear after a user has interacted with it. Select “30” days.
- Choose which pages you want to add to “Show/Hide on These Pages” option:
- Select “unchecked” for the “Hide on Homepage” checkbox.
- For the “Show on Only These Pages,” you’ll want to add which pages you’ll have the link promotion popup. I have not entered any page names so far.
- Add which pages you want to hide the link promotion pop-up in the “Hide on These Pages” section.
- For the “Show This Message” setting, you’ll want to choose the “On Exit” option.
- Choose the “Activate Tool”
-
See “List Building” is added in “Website Tools.” If you want to edit, then click on the “SETTINGS” button, and it will take you to the “edit link promotion” page. After you update the settings, then click the “Update Tool”

- Select the “Get This Code”

- Choose “My Site is All HTML Website.”
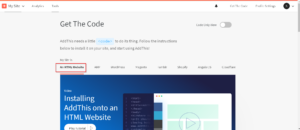
- Copy the JavaScript code.

- Paste the above code right above the closing</body> of the HTML in your website. Open the Engine.Webstore project.

- Open the “cshtml” page from the “Views/Themes/B2B/Views/Shared/” folder and paste the code in the last line. You’ll see the code in the highlighted red rectangle in below screen shot:

- When you run the project, a List Building popup with a message appears on the website.
Below is the desktop view:

Below is the mobile view:

For the email subscription, enter your email address and click the “Subscribe” button. Finally, a Mailchimp account will be added to this email address.
That’s All it Takes
This is a ready-to-use code for generating email lists using the Znode B2B Ecommerce platform. We don’t build proprietary code to link third-party subscription service application performance integrators (APIs) like Mailchimp, Get Response, or Constant Contact. It also makes utilizing the List Building tool to add email addresses to your subscriber email list easier.