
Hello friends, I am back with another interesting topic called “time travel.” I believe many of you wish you could go back in time and fix something. The idea of time travel was made possible in the fictional world of movies and books, including Aditya 369 (released during my teens), recent Marvel movies, and Tenet. Although we know that cannot time travel in the real world, it is possible within the technology world (with databases, for example).
Have you ever landed into a situation where you ran a bad update/insert/delete/drop and wanted to go back to the pre-state? To certain extent you can with Time Travel. Specifically, you can go back in time and magically “restore” the previous state.
I had been using Oracle for over couple decades and often we practice to take a “back-up” of the table before performing any kind of operation. If everything goes fine, we either discard it or leave it for tracking purposes. With major databases like Oracle, if we had not done this “back-up” then you had to reach out to a database administrator (DBA) to find a way to restore it from Logs or tapes (of course you could restore the dropped table from Recycle bin). Creating a “back-up” is not a perfect solution, however, because it comes with hefty price of high disk usage and it can be time-consuming.
New technologies and database are built keeping flexibility and simplicity in mind. In addition to the low cost of data storage and the ubiquity of cloud, innovation has no limits.
The advantages of technology capable of time travel include:
- You can confidently perform the activities that you would like to do and compare them with historical versions (without incurring costs)
- It saves time
- It reduces disk or storage costs
So, lets jump back to the Data Warehouse tools that I recently wrote about which have time travel built in. These do not need any external team’s assistance and can be performed by a regular developer/tester with few sets of commands. They are none other than:
- Snowflake
- BigQuery
The time travel feature is possible due to the “fail-safe” methodology that is completely managed behinds scenes by these vendors. I will explore the fail-safe measure in more detail in later blogs.
Please note that fail-safe does consume storage space but its a lot cheaper than traditional methods. You do not need external team to add disk space to it as these technologies use Cloud storage, which is inexpensive.
Let’s now jump into the details of each data warehouse and also compare them next to each other.
Snowflake
Snowflake is Multi-Cloud Data Lake/Warehouse tool that is fully built on cloud, for cloud, and its architecture is defined on a shared-disk and shared-nothing database architecture. We looked at its architecture layer in my earlier blog.
Time travel with Snowflake is called “Continuous Data Protection Lifecycle” and you can preserve the data for a certain period of time. Using this feature, you can perform certain actions within the time window including:
- Query data that has since been updated or deleted
- Create clones of entire tables, schemas, and databases at or before specific points in the pas
- Restore tables, schemas, and databases that have been dropped
After the elapsed time window, the data moves to Snowflake’s “fail-safe” zone.
The beauty of this comes with SQL statements where you can restore:
- At certain point in time (using either Time Stamp)
- Offset (in seconds from current time)
- SQL ID
Snowflake offers different flavors time travel and they differ from version to version. The standard version gives you 24 hours of time travel (like a well-known movie 24 by Surya). Versions above Standard range between 0 to 90 Days! But by default, it is set to 1 day for all account levels.
Now, let’s jump into the technicalities of this time travel.
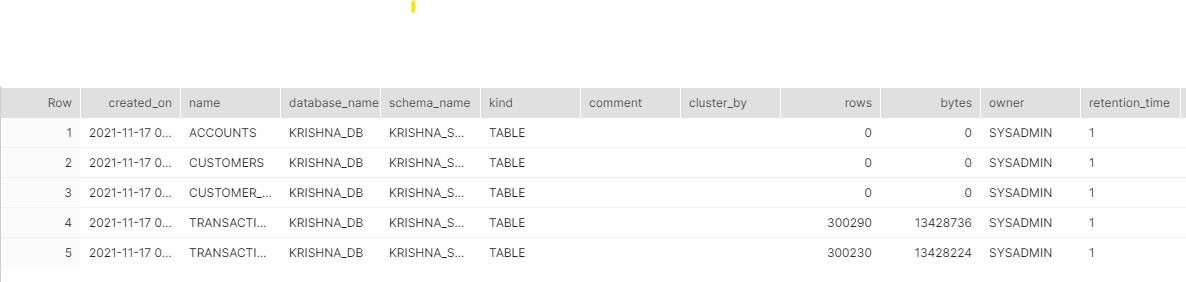
First, lets check the retention set at our account level, Its set to default 1. (Please note I have 30 Day free-tier Snowflake Enterprise Account)

I created certain tables while this retention is one, all these tables have Just 1 day.
Now, I increase the retention by 90 Days at account level:

As soon as I change to 90, I have all my tables increased to 90 Days!

Now, let me throw in a scenario. Please note I am using banking and AML nomenclature for tables and conventions.
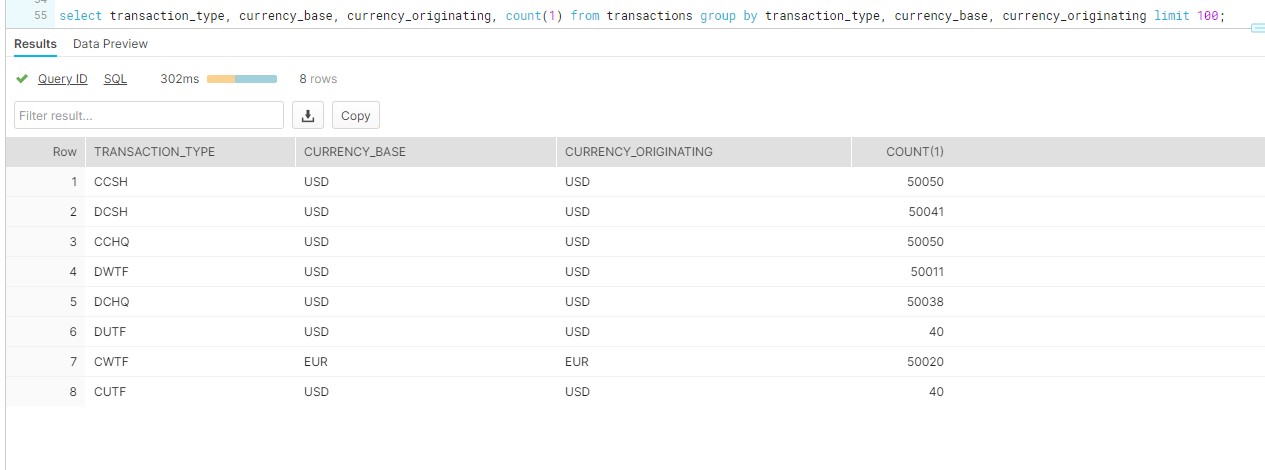
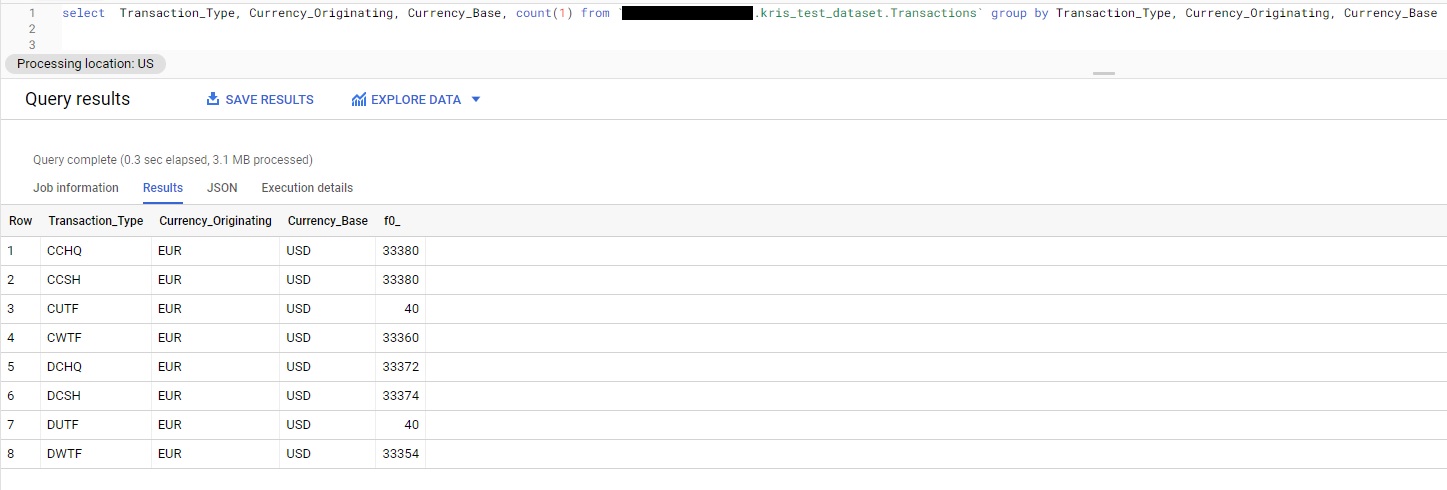
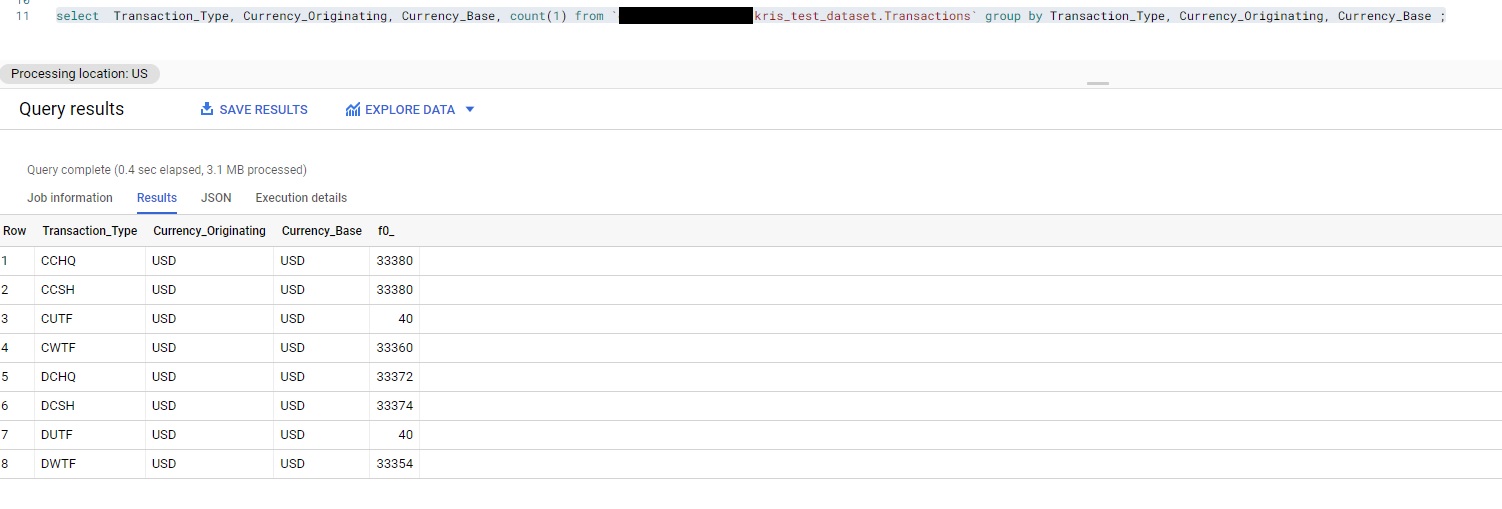
- Our Transactions table has data of different Transaction Types and the Originating Currency and Base currency.
- We found an issue that all credit wire transactions (CWTF) have both Originating Currency and Base currency as USD.
- This needs to be fixed for only CWTF types.
Let’s see the data spread:

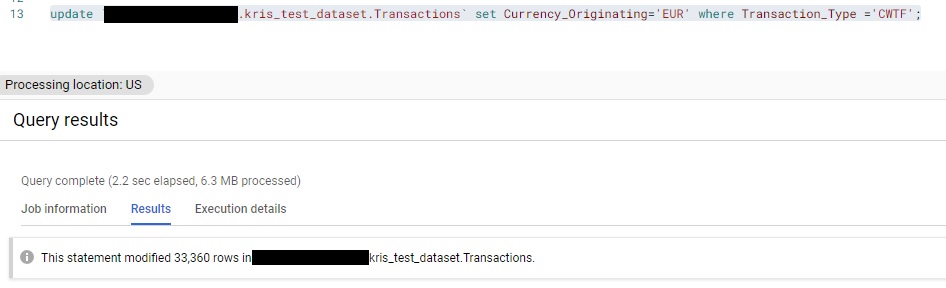
So, we must touch only Line item 3 and update CURRENCY_ORIGINATING from USD to say EUR (about 50K records).

Ideally what we do is:
- Take back up of Transactions and name it Transactions_20211124 (the date on which we are creating)
- Update the Transactions table
- Finally drop the temp Transactions Table (or leave it for tracking purposes). The drop won’t cost anything, but if needed for audit purposes, it will consume space.
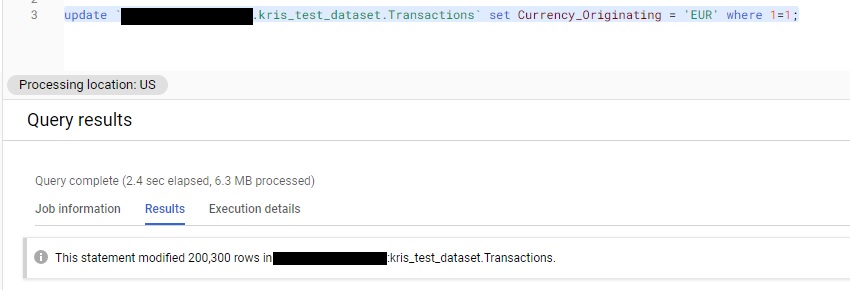
What if we forgot to take back up and hit commit (say my session has auto-commit)? You are doomed and cannot even go back in time to fix it! So, lets run through a scenario where I ran an incorrect statement where I updated both Currencies to EUR!
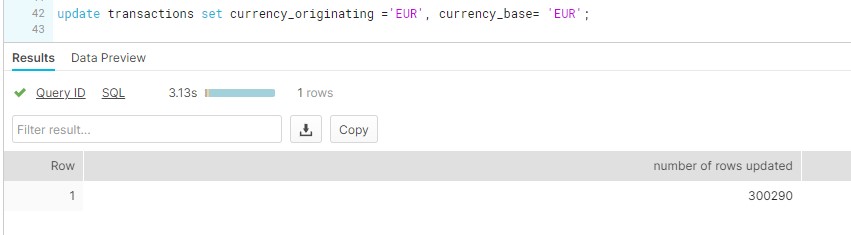
Upon checking!

Now what? Well, I should not be that worried, as I can still go back in time and restore the table back. That would look like:
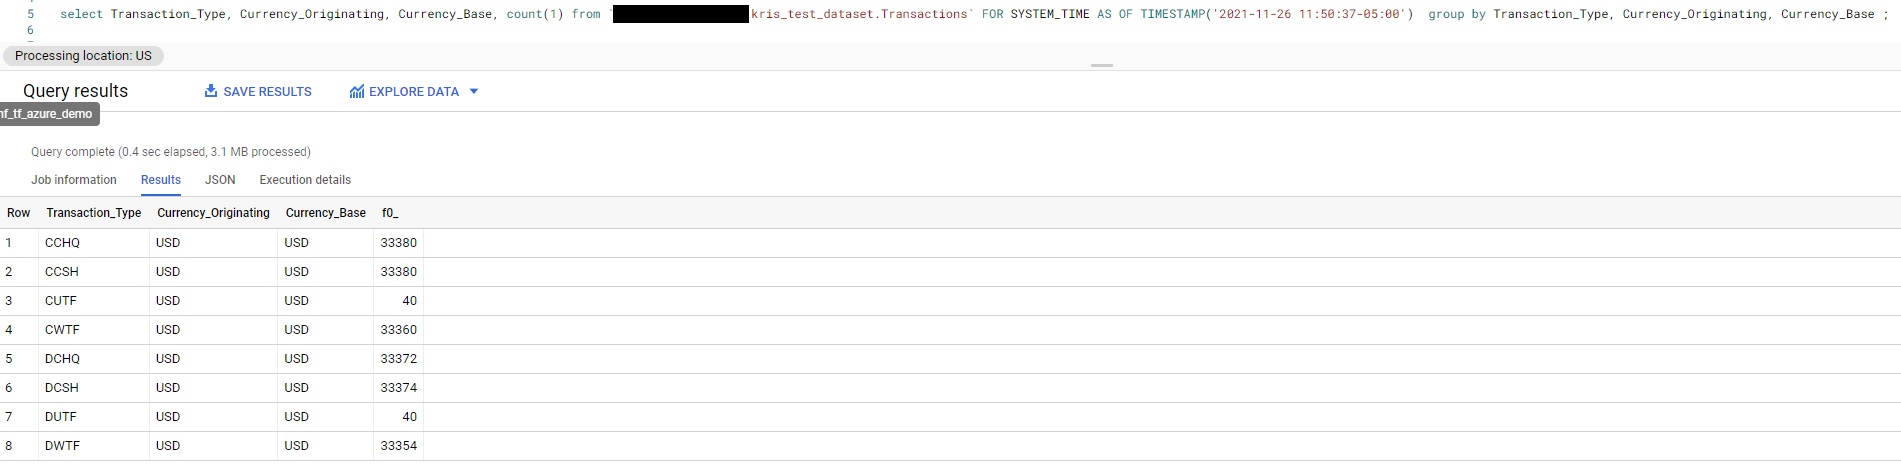
- Find the SQL ID from the History, for me its “01a0812f-0000-5c7b-0000-00010fca53ad” and see the data

I can still see the old data, so all I have to do is take this data and re-insert it into the current table (although it sounds simple, in production we need to be cautious!) (If its an OLTP system where data is constantly pouring in, we need to apply different methods). For now, I am simply overwriting my original table.

We see that the data has been restored. Now, I’ll run the correct update.
The correct update updated 50K records.

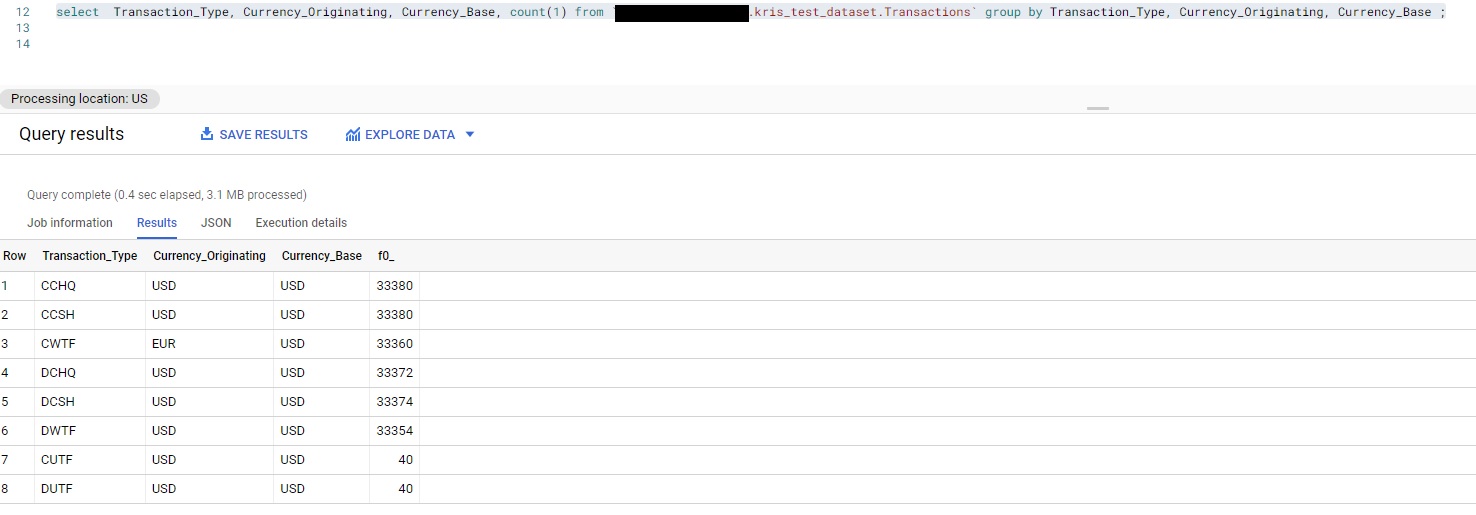
The final data:
Now, you have seen the power of the Time Travel and how we can use that when in need.
Let’s look at how we can achieve this in BigQuery and what are its features are
BigQuery
BigQuery is a cloud Database by Google and also supports time travel. It does not have multiple “flavors” like Snowflake does, but it supports 7 days of time travel. This feature supports the following:
- Query data that was updated/deleted
- Restore a table that is deleted (aka Dropped)
- Restore a table that is expired
If we want to access the data beyond 7 days, we can take regular Snapshots of the database (e.g., Oracle). We can talk on Snapshots in later blogs, but for now let’s stick to time travel.
Unlike in Snowflake, in BigQuery we can only use point in time using a time stamp.
I have a similar table in my BigQuery but it has less volume.
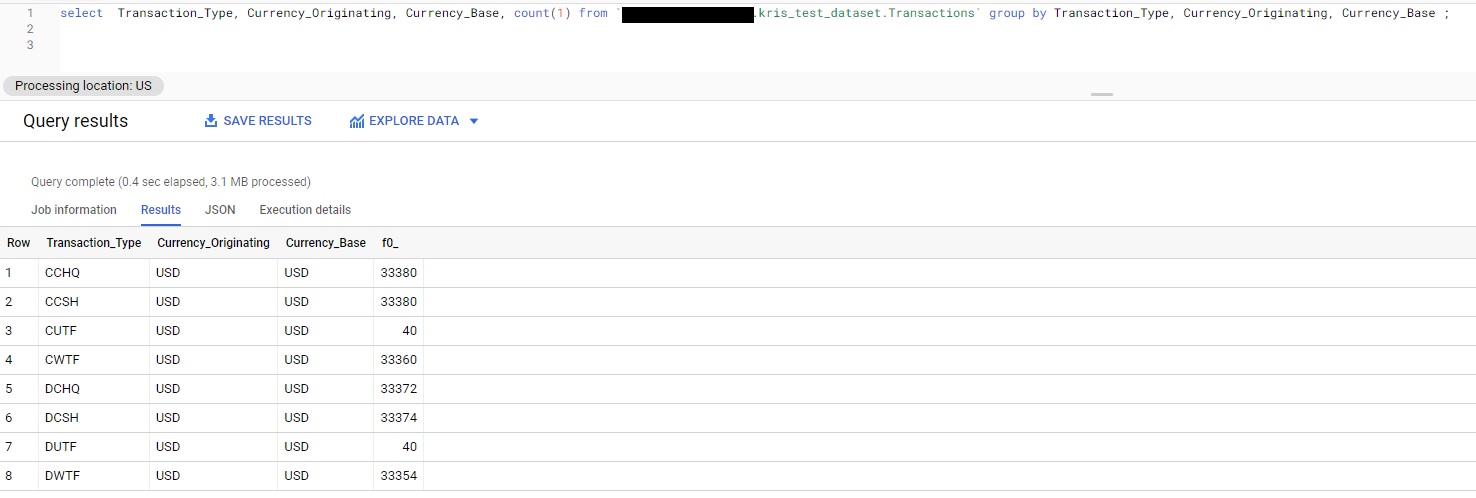
Lets now do the same activity try to update the Row 4 CWTF transaction type from Currency_Originating from USD to EUR (But lets first run in correct statement)!
Now, we have updated the data incorrectly. Let’s use BigQuery Timestamp methodology and go back in time and fetch the data before it updated, view it, and restore it (I ran the update at 11:50 AM EST, so I need to get back before then).

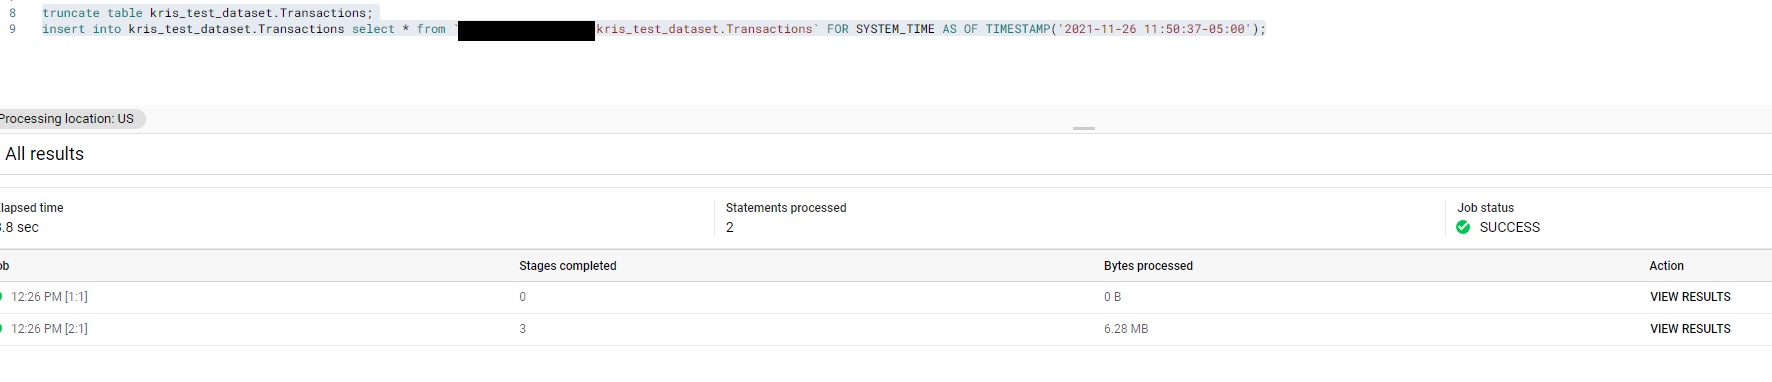
Now let’s restore this data back to the master table. Note that BigQuery does not have any way to insert overwrite, so you may either use merge (if you know the keys, or truncate and insert). I took the later approach for my POC as I don’t have a key on which I could simply update. Please avoid truncate and insert in any production environment.
The data post restoration:
Now lets cautiously update the data and run the validations, and we should see Just 33,360 Records updated with EUR.
Behold, we did update the data correctly!
Now we could see how we could use the time stamp or other option of going back in intervals (usually by the hour) to fetch data. Remember that BigQuery only holds the data for the past 7 days—after the 7 day period, you will lose the data.
A few additional observations:
- You can only go back in time in Intervals of hours, so if you have given time beyond the hours the data is not existing you will see an error:

- It is a little tricky when you are using “FOR SYSTEM_TIME AS OF TIMESTAMP“, even though you can get the time stamp from your job history, because you have to provide your time zone as BigQuery executes all times using UTC. For me, I had to give the time as:”TIMESTAMP(‘2021-11-26 11:50:37-05:00’)“, where -5:00 is EST Hours, so you should provide your own timezone so BigQuery can accurately pull data.
Synopsis
We have seen how we could safely bring back the data from history with few sets of commands without relying on DBA’s or any other mechanism. Now, I would like to caution few things:
- Time travel is a cool mechanism but it needs to be used with extreme caution.
- You need to look at the retention at the account level and table level to ensure you are within your bounds of restore.
- You cannot simply overwrite the data from history to current as it may cause some overwrite of the data that has been inserted between the delete and now, so pay extra attention here.
Even though I mentioned the traditional “back-up” as time consuming and costly, you may go for it if you need to prepare for an audit, and remember that Time Travel and Fail Safe have a maximum life span of 97 Days (Fail Safe is 7 Days and this is out of your control) and Time Travel is 90 days (maximum) for Snowflake Enterprise accounts and above.
In this particular use case, I found Snowflake as more advantageous because of its ease of use and the span of time that you can time travel (90 days versus 7).
In the next session, I will dig in on how both systems could have implemented from Architectural point of view as I have not seen much documentation on implementation. Until then, signing off!