
Welcome back! First and foremost apologies for the long wait on this blog post. Planning for a wedding, moving, and work is surprisingly time consuming ;). Anyways, last time we discussed dial plans, voice routing basics, and how to prepare for Direct Routing. This time we’ll discuss how to leverage multiple SBC’s in your environment as well as how to configure your SBC to support Direct Routing!
Leveraging Multiple SBC’s
It is always best practice to plan for disaster recovery and/or high availability when an SBC is used in your environment. There are a few different ways you can do this:
- Load Distribution and High Availability Method
- Group multiple SBC’s into a single voice route
- If you need to take an SBC down for maintenance or if you lose power to an SBC the load will just be distributed to the other SBC’s (assuming they can handle the full load)
- **Combine multiple SBC’s in a cluster
- Teams will see this cluster as only 1 SBC
- This has the same effect where load will be distributed among the SBC’s in the cluster
- Group multiple SBC’s into a single voice route
- High Availability with back-up routes
- Used in situations where you want additional SBC’s as a backup
- Configure multiple voice routes and have priorities assigned to these voice routes
- If no SBC is available to take a call with the highest priority, then the next voice route with the next highest priority will be used
- Allows you to failover to other SBC’s if you need to
- Disaster Recovery
- Configure voice routing policies to allow only certain users the ability to use specific routes
- If all SBC’s in the US were lost, a subset of the users (likely executive level users) will have the ability to place calls to the US via the European SBC’s
- Configure voice routing policies to allow only certain users the ability to use specific routes
**Indicates that the cluster feature is only available for some SBC vendors
Multi-tenant SBC Usage
If you are a partner to Microsoft and want to entertain the idea of offering the hosting of SBC’s then this will be very relevant. However, if this doesn’t fit your scenario feel free to skip this section 🙂
There are 2 pieces of the configuration that need to be accounted for, the hoster configuration and the customer configuration.
- Hoster configuration – As the partner responsible for deploying and hosting the SBC you will need to:
- Register the domain name in the carrier’s tenant
- If the partner has the domain “perficient.com” they would then add the new domain name “customer.perficient.com” to host all of the SBC names
- Request a wildcard certificate
- *.customer.perficient.com
- Used for all SBC’s and all customers access this SBC
- This one certificate will be sufficient to support any number of customers on any number of SBC’s
- For each customer register the subdomain
- customer1.customer.perficient.com
- In the O365 portal they will need to register this new domain and the certificate will be valid for this domain because it is a wildcard certificate
- customer1.customer.perficient.com
- Use the FQDN with the customer subdomain for the SBC
- customer1.customer.perficient.com
- If you have multiple customers, then you will have multiple FQDN’s pointing to the same SBC
- The wildcard certificate will again be able to verify the identity of all domains
- customer1.customer.perficient.com
- Register the domain name in the carrier’s tenant
- Customer configuration – On the customer side of things you will need to do the following:
- Register and active the subdomain in your tenant
- customer1.customer.perficient.com
- Configure the trunk from the hoster to your tenant
- Register and active the subdomain in your tenant
Microsoft also has a great diagram to help you better understand this concept:
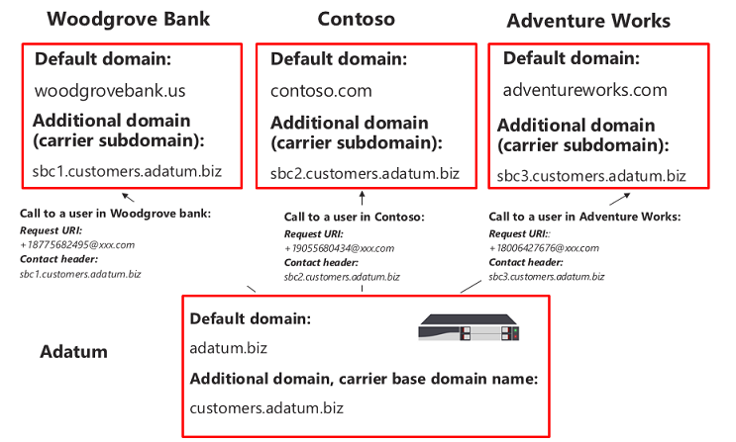

As you will see in the picture above we have the hoster of the SBC (Adatum) and the 3 customers (Woodgrove Bank, Contoso, and Adventure Works). The default domain for Adatum is adatum.biz and they will need to add the additional domain (customers.adatum.biz) to provision the customers with access to the SBC. They will also need a certificate (*.customers.adatum.biz) so they can support all different FQDN’s that they will use. For Woodgrove Bank they will use sbc1.customers.adatum.biz, Contoso will use sbc2.customers.adatum.biz, and finally Adventure Works will use sbc3.customers.adatum.biz. Now Adatum will be able to serve all 3 customers with this single SBC and single certificate! As mentioned earlier we will also want to add additional SBC’s for high availability and/or load distribution.
SBC Configuration
Now the moment that you’ve all been anxiously waiting for, it is time to configure the SBC! There are a number of steps that you will need to take into account in order to ensure a successful SBC deployment.
- Assign the SBC a license
- Configure the LAN and WAN IP Interfaces
- Configure the certificate
- Configure signaling and media ports
- Configure SIP Options and SRTP
- Configure connection to the PSTN next hop
If you think this sounds like a lot, then you are correct and unfortunately we won’t be digging into the step-by-step configuration in this article (maybe in the future though :)). However, know that Microsoft has provided a link where you can find guidance on each vendor’s SBC.
Pairing the SBC
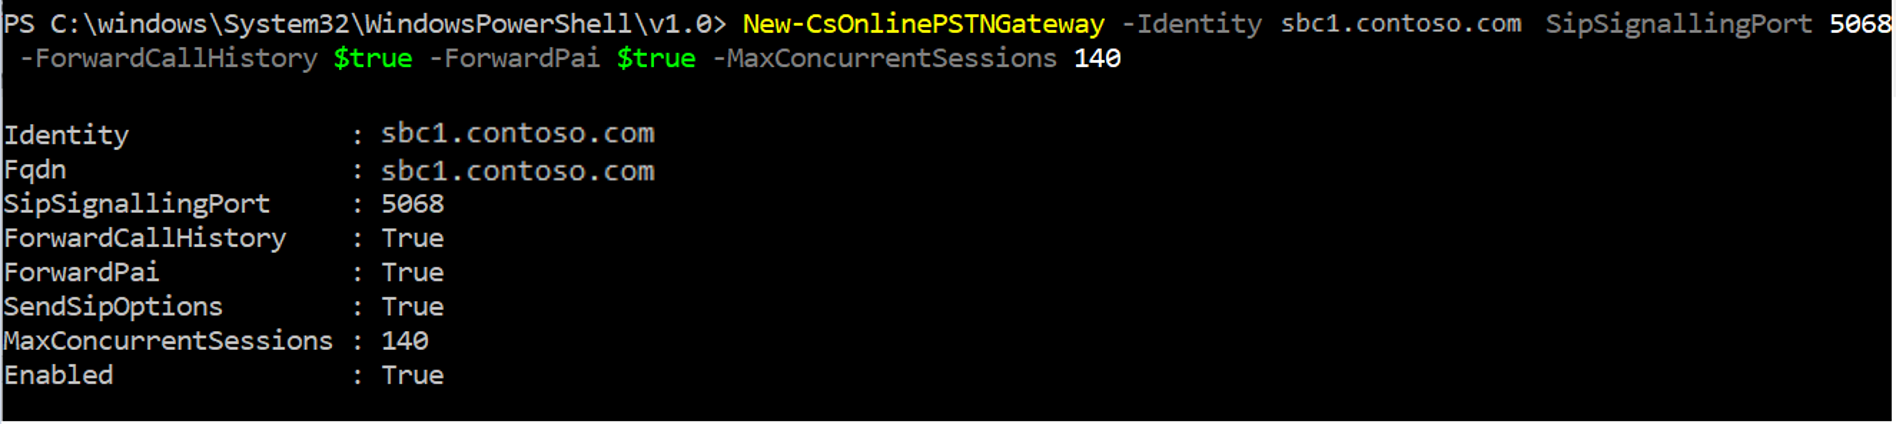
So let’s say you have followed your vendor’s guidance on configuring your SBC. Now what? Well, now it is time to pair your SBC with your environment. In order to do this, you’ll need to run the following PowerShell cmdlet:
New-CsOnlinePSTNGateway -Identity <SBC FQDN> -SipSignalingPort <SBC SIP Port> -MaxConcurrentSessions <Max Concurrent Session which SBC is capable of handling >-Enabled $TRUE
So you ran that command but you have no clue what each of those attributes meant… Don’t worry we’ll break them down here:
CsOnlinePSTNGateway Parameters
- SipSignalingPort
- This will be the listening port for SIP signaling on the SBC
- The listening port is used for communicating with Direct Routing services by using the Transport Layer Security (TLS) protocol
- The value must be between 1 and 65535.
- Enabled
- Enables the SBC for outbound calling. In addition, when enabled is set to $false this allows you to put the SBC in a disabled state while you update the SBC. During this time, the SBC will still allow for incoming calls, which will ensure all existing calls will remain intact but all outbound calling will not utilize this SBC. Once the SBC is completed drained of any ongoing calls you can then proceed with updating/maintenance/etc.
- (default value -Enabled $false)
- Enables the SBC for outbound calling. In addition, when enabled is set to $false this allows you to put the SBC in a disabled state while you update the SBC. During this time, the SBC will still allow for incoming calls, which will ensure all existing calls will remain intact but all outbound calling will not utilize this SBC. Once the SBC is completed drained of any ongoing calls you can then proceed with updating/maintenance/etc.
- ForwardPAI
- This parameter indicates whether the PAI (P-Asserted-Identity) header will be forwarded along with the call. The PAI gives you a way to identify the caller and is typically used for billing purposes.
- (default value is $false)
- This parameter indicates whether the PAI (P-Asserted-Identity) header will be forwarded along with the call. The PAI gives you a way to identify the caller and is typically used for billing purposes.
- ForwardCallHistory
- This parameter indicates whether call history information will be forwarded through the trunk. When enabled, the O365 PSTN proxy will send 2 headers, “History-Info” and “Referred-by”.This can also be used for billing purposes
- (default value is $false)
- This parameter indicates whether call history information will be forwarded through the trunk. When enabled, the O365 PSTN proxy will send 2 headers, “History-Info” and “Referred-by”.This can also be used for billing purposes
- SIPOptionsEnabled
- With this parameter enabled, the SBC and O365 cloud can exchange SIP Option messages to determine if the SBC is available or not. If the SBC is not available then there is no need to send calls to that SBC and by realizing this you can make sure no calls are missed.
- However, if this parameter is set to false (disabled) then the SBC will be excluded from both the Alerting and Monitoring systems.
- This parameter is highly recommended to be set to $true (default)
- MaxConcurrentSessions
- This parameter is used by the Alerting system. Depending on the value set, the alerting system will generate an alert to the tenant administrator if the number of concurrent sessions is 90% or higher that the value set.
- If the parameter is not set, then no alerts will be generated. However, the monitoring system will still report the number of concurrent sessions every 24 hours.
- By default, this value is not set
- EnableFastFailoverTimer
- If set to true, any outbound calls that are not answered by the gateway within 10 seconds will be routed to the next available trunk. However, if no additional trunks are available the call will be automatically dropped. For organizations with slow networks or slow gateway responses this can potentially generate a false positive for the failover thus calls will be dropped unnecessarily. If this scenario fits your environment, it is recommended that you disable this failover timer.
- (default value is $true)
- If set to true, any outbound calls that are not answered by the gateway within 10 seconds will be routed to the next available trunk. However, if no additional trunks are available the call will be automatically dropped. For organizations with slow networks or slow gateway responses this can potentially generate a false positive for the failover thus calls will be dropped unnecessarily. If this scenario fits your environment, it is recommended that you disable this failover timer.
- MediaBypass
- This one is pretty self explanatory, but if enabled media bypass will be used.
- Media Bypass refresher here!
- (default value is $false)
This ends today’s blog on Direct Routing. In the final blog of this series we’ll cover some examples of user provisioning, simple configuration, advanced configuration, and lastly how to manage Direct Routing. I hope you have found this blog helpful, and I hope to see you back soon for the last blog in this series!